Prior to using the ChaosHunter Runtime Add-In to Microsoft Excel, you need to load the Add-In into Excel.
Using the ChaosHunter_Runtime.xla Add-In
1. Click on the Tools Menu.
2. Select ChaosHunter Runtime.
3. A dialog box is displayed which allows you to select a trained model file.
Using the Dialog Box
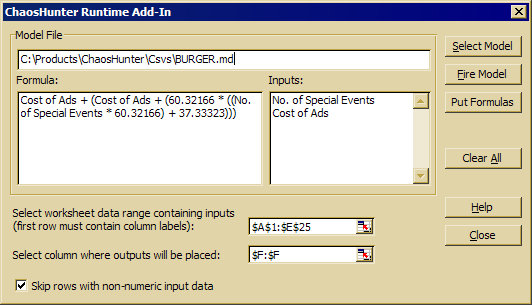
1. Model File. Select a model trained with the ChaosHunter. Do this by clicking on the Select Model button. A file selection box is displayed which you may use to choose the name of a trained model file. (Trained model files usually have a .MD extension.) Click on the name of the correct model file.
2. Insure the correct model is loaded by examining the information about the model that is displayed on the screen.
3. Select a range of data on the worksheet which contains input data. An edit box is displayed with a spreadsheet icon on the right. Click on the spreadsheet icon and the mouse pointer is returned to the spreadsheet. Use the mouse pointer to select (blacken) the range of cells which contains input data. The selected range of cells is displayed in an edit box. Click on the spreadsheet icon to return to the dialog box.
Note: When selecting inputs, DO NOT SELECT COLUMNS. Be careful to only select a range of cells which contains INPUT VALUES and which does NOT contain labels or blank cells. Also, the topmost row in selection MUST contain column labels.
![]()
4. Select a column on the worksheet which will receive model predictions. An edit box is displayed with a spreadsheet icon on the right. Click on the spreadsheet icon and the mouse pointer is returned to the spreadsheet. Use the mouse pointer to select (blacken) the letter of the column where the model's results will be placed after the model is fired. If you are using a trading strategy model, be aware that the program will use three columns to display raw formula output, trading signals, and system equity. If you don't have enough blank columns, the program may overwrite existing data on the spreadsheet.
5. Fire Model or Put Formulas. Once you have selected the data ranges in Steps 3 and 4, you can either click on the Fire Model or Put Formulas buttons to display the model's results in the spreadsheet.
Fire Model places a value for the model's result in the spreadsheet cell. Fire Model does not cause the model's results to be recalculated if you change a value in the input range.
Put Formulas places a call to the FireModel function in the spreadsheet cell rather than a value. Therefore, if you change a value in the input range, the model's results are recalculated. Note: If you wish to save the spreadsheet with the formulas, remember to save it as an .XLS file rather than a .CSV (comma separated) or other type of text file. Otherwise, the formulas will be replaced by values.
6. Clear All. Click on this button to remove the current entries in the edit boxes.